
Multi File Extract Staging Table
The Multi-File Extract Pattern is specific to file sources. First, the developer defines a File connection with a wildcarded file name pattern. Dimodelo Data Warehouse Studio will extract the data from all files, that exist at the specified directory and match that naming pattern, into the persistent staging table. Dimodelo Data Warehouse Studio then archives the processed files in an archive folder.
This tutorial requires 2 files that can be found in the Get the Course Material topic. Download these files and save them to a broadly accessible directory. We use “C:\Dimodelo” in this tutorial.
Video – Creating a File connection
Task – Create a Transactions Multi-file Connection
- Expand the Connections>File folder in Solution Explorer
- Right-click ‘Multi Flat File‘ and click Create New.
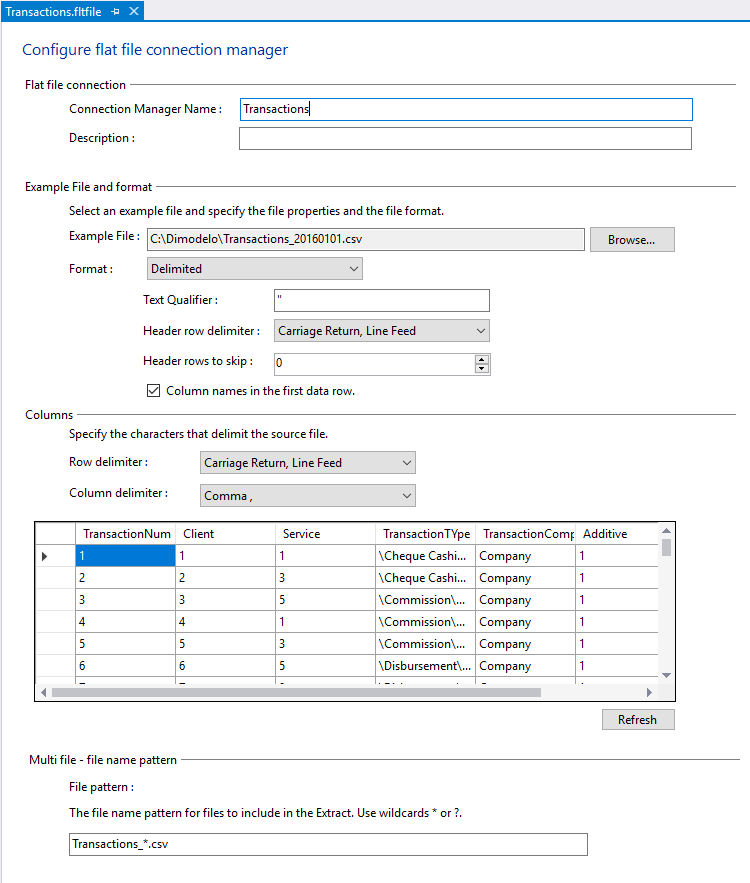
- In the ‘Connection Manager Name‘ field type “Transactions“.
- Click the Browse button and browse to the folder where you saved the transaction files, in this case, C:\Dimodelo.
- Select the Transactions_20160101.csv file and click Open.
- Leave the Format as delimited. Dimodelo supports Delimited and Fixed width file. If you select Fixed Width an additional ‘Column widths’ filed appears. Enter a comma-delimited list of column widths for the file e.g. 12,50,100,24.
- Leave the ‘Text Qualifier‘ as default. If the file used a different text qualifier e.g. ^, then you can change that here.
- Leave the ‘Header Row delimiter‘ as default. Some files just use a Carriage Return or just use Line Feed. Also, some files have a different header delimiter to row delimiters. A good way to check is to open them in notepad++ and turn on symbols.
- Leave ‘Header rows to skip‘ as default. Some files may have rows that are preamble or descriptions for the file. You can skip these rows by setting this field to a number.
- Leave ‘Column names in the first data row‘ ticked. If the file doesn’t contain column names, then untick.
- Leave ‘Row delimiter‘ as default. Some files just use a Carriage Return or just use a Line Feed. Also, some files have a different header delimiter to row delimiters. A good way to check is to open them in notepad++ and turn on symbols.
- Leave ‘Column delimiter‘ as default. This is the character that delimits fields in rows.
- Click the Refresh button. You should see a preview of the first 200 rows of your file.
- Set ‘File pattern‘ to “Transactions_*.csv“. This instructs Dimodelo Data Warehouse Studio to look for any files matching Transactions_ followed by any series of characters and ending in .csv. You can also use % for just a single character wildcard.
- Click the Save (disk icon) on the Visual Studio toolbar to save the Connection. An information dialog appears letting you know that the Connection will be added to each of the configurations.
- Click Ok in the information dialog.
Your result should look like this:
Review the Configuration
Dimodelo supports deployment to multiple environments. You can customize file path connection properties for each environment. To review the connection properties for the Development environment, do the following.
- Expand Configuration>Configuration Files.
- Double click Development.cuf to open the Development configuration.
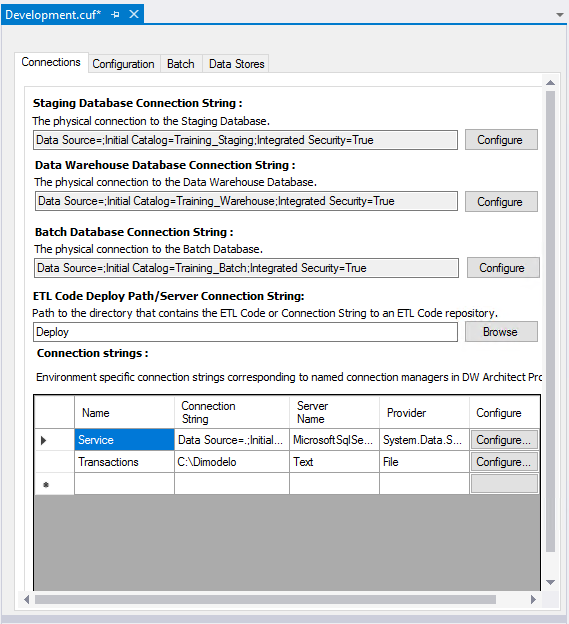
- In the Connection strings list click the Configure button next to the Transactions connection. The Connection Properties dialog appears.
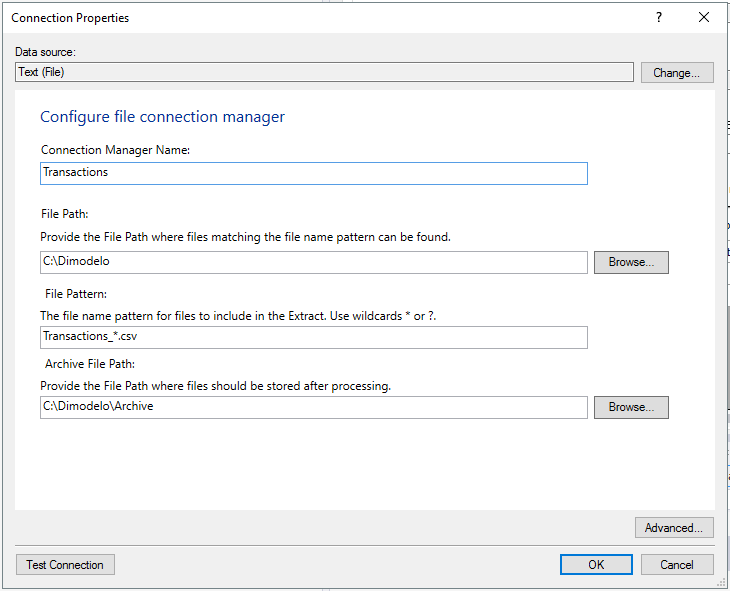
In this dialog you define the properties that are specific to the Development environment. Other environments (e.g. Test, Production) can have there own property values.
- File Path. The path where the files can be found in the Development environment.
- File Pattern. In each environment, it is possible to have a different file pattern.
- Archive File Path. The path where processed files are archived in the environment.
Task – Create a Transactions Source System
To Create a Source System:
- Right-click the Source Systems folder in the Solution Explorer and click Create New.
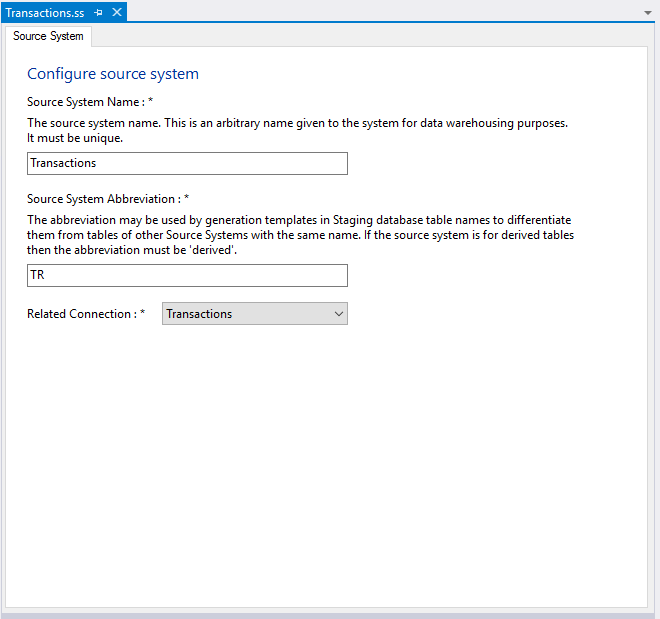
- Source System Name. Give the source system the unique name “Transactions“. This is the name that appears in the Solution Explorer.
- Source System Abbreviation. In this case, use the source system abbreviation “TR“. The ‘Source System Abbreviation’ should be a two or three letter abbreviation that is unique within the project. The ‘Source System Abbreviation is used to prefix table names in the Staging database. This ensures there is no naming conflict when staging tables with the same name from more than one Source System.
- Connection. Associate the Source System with the “Transactions” connection you just created. Select the “Transactions” Connection Manager in the dropdown. This is mandatory.
- Click the Save icon (disk icon) in the Visual Studio Tool Bar.
Task – Create a new “Transactions” Persistent Staging table
- Expand the Staging folder, right-click Persistent Staging and click Add New.
- Select “Transactions” in the Source System.
- In the Staging Table Name field type “Transactions“.
- Enter the “This is a Transactions persistent staging table” Description in the Description field. This is optional.
Staging Columns
The quickest way to define the columns of the Staging table is to import the column definitions from a Source table. If there isn’t a matching Source table, then you can manually define the columns. To import a Source table do the following:
- Click on the Staging Columns tab.
- Click the Import Schema button.
- Select “Transactions” in the Connection dropdown. Because a file only contains a single “table” the Import Table is disabled.
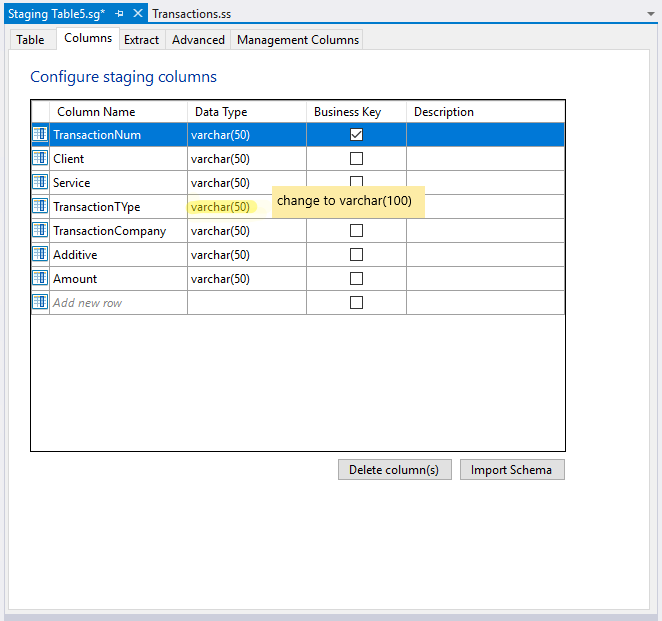
- Click Ok. The columns and data types of the source table are imported into the Staging table design. All columns are imported as varchar(50) data type. This is because files don’t have associated schema. We recommend you keep the varchar data type and make the size bigger and smaller as required. It is possible to define a column as a different type. Dimodelo will try to implicitly convert it. However, you may need to explicitly convert it in the Extract mappings. It’s easier to do the conversion in higher layers, so we recommend leaving the data as varchar and converting as required in the transforms.
- Tick the ‘Business Key‘ column in the TransactionNum row. A file doesn’t have a primary key defined, so it is necessary to manually tick the business key for the staging table.
- Change the length of the TransactionTYpe column to a varchar(100)
Advanced Tab
On the Advanced tab, you will be presented with additional properties for the staging table. These properties are based on the target technology for the data warehouse. In this case, the target technology is Azure Data Warehouse, so you are presented with a DISTRIBUTION option with a default.
- Just keep the default options on the advanced tab.
Task – Create a File Extract
- To define an Extract select the Add button on the Extract tab. The Extract dialog appears.
Overview Tab
- Extract Name. Keep the default Extract Name.
- Extract Pattern. Select “File” in the Extract Pattern field. The selected pattern is used to determine the type of code that will be generated for this Extract.
- Extract Overview. Optional. Enter a description of the extract for documentation purposes.
Source Tab
The Source tab defines the source table or query of the Extract.
- Click on the Source tab.
- In the Source Connection dropdown select the “Transactions” connection.
- In the ‘Table or View‘ dropdown select the “Transactions_20160101.csv” table (its the only table in the file).Your result should look like this:


Mapping Tab
- Click on the Mapping tab. Dimodelo Data Warehouse Studio automatically maps the columns.Your result should look like this:

- Click Ok.
- Click Save (Disk icon) in the Visual Studio Toolbar to save the staging table.
