
Incremental Extract Staging Table
The incremental extract pattern only extracts data that has changed since the last time the extract ran. It reducing the load on your source systems and drastically reduces the time it takes to run the Extract.
The pattern generates code that extracts only changed data from your source. For example, you could use this pattern to extract only sales transactions that have been inserted or updated since the last time the extract was executed. For the pattern to work, you need to identify a column or multiple columns that the source system uses to track change. These columns are called ‘Change Data Identifier’ columns. They would usually be a modified date or sequential identifier.
Each time the Extract is executed Dimodelo saves the maximum value that was extracted for the ‘Change Data Identifier’ column(s) to the Control Parameters table in the Staging database. Subsequent executions of the Extract only retrieve data from the source where the ‘Change Data Identifier’ column(s) value in the source is greater than the maximum value stored by the previous invocation of the Extract. This is the mechanism Dimodelo uses to manage your incremental extracts.
Create a new “Timesheet” Staging table
- Expand the Staging folder, right-click Persistent Staging and click Add New.
- Select “Service” in the Source System field. The Source System is used to define the name of the Staging table in the Staging database. The table name in the Staging database will be Schema.Source SystemAbbreviation_Staging Table Name.
- In the Staging Table Name field type “TimeSheet”. The name is used to define the name of the table in the Staging database. The table name in the Staging database will be Schema.Source System Abbreviation_Staging Table Name.
- Enter the “This is a TimeSheet persistent Staging table” Description in the Description field. This is optional. The Description is used as an overview for the table in the generated Documentation.
Staging Columns
The quickest way to define the columns of the Staging table is to import the column definitions from a Source table. If there isn’t a matching Source table, then you can manually define the columns. To import a Source table do the following:
- Click on the Staging Columns tab.
- Click the Import Schema button.
- Select “Service” in the Connection dropdown. The Import Table field is populated with tables and views from the source.
- Select the “dbo.TimeRecord” in the Import Table field. You can also start typing dbo.Tim… and the match values will display for selection.
- Click Ok. The columns and data types of the source table are imported into the Staging table design.
Your result should look like this:

Further Information
- Modify a Column Name. Tip… Only modify the column names after you have defined an Extract. That way Dimodelo Data Warehouse Studio will automatically match the columns in the Source table with columns in the Staging table based on the name when you edit the mapping in the Extract. After that, you can come back and change the name, Dimodelo Data Warehouse Studio recognises the name change. The Column Name becomes the name of the column in the Staging Database.
- Modify a Column Data Type. You can change the data type of a staging table column. Note, This may mean you need to modify the Extract to convert the data type of the Source column in column mapping using an Expression.
- Add a Description. This is optional. The Description is used in the generated Documentation.
- Delete a Column(s). Select the column(s) and click the Delete column(s) button.
- Add a Column. You will need to add a mapping in the Extract if you add a column.
Dimodelo Data Warehouse Studio will Sync the columns when the Data Warehouse is deployed.
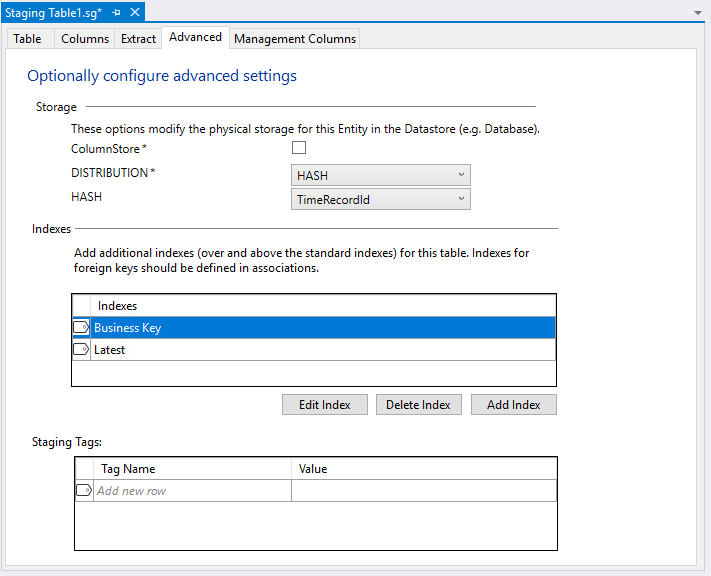
Advanced Tab
On the Advanced tab, you will be presented with additional properties for the staging table. These properties are based on the target technology for the data warehouse. In this case, the target technology is Azure Data Warehouse, so you are presented with a DISTRIBUTION option with a default.
- DISTRIBUTION. Select HASH in the DISTRIBUTION dropdown. The HASH property appears and is defaulted to the first business key (there might be more than one) of the staging table.
Your result should look like this:
Add an Extract to the Staging table
- To define an Extract select the Add button on the Extract tab. The Extract dialog appears.
Overview Tab
- Extract Name. The Extract Name is important as it is used to uniquely identify the Extract and is used by the standard generation templates to name the generated code artifact. E.g. A stored procedure might be called Extract_Extract_Name. The name defaults to source system abbreviation_Staging table name. Make sure the name matches a task in the Workflow (it will by default). See more about Workflows in the Batch Management Facility document.
- Extract Pattern. Select the “Incremental Extract” in the Extract Pattern field. The selected pattern is used to determine the type of code that will be generated for this Extract.
- Extract Overview. Optional. Enter a description of the extract for documentation purposes.

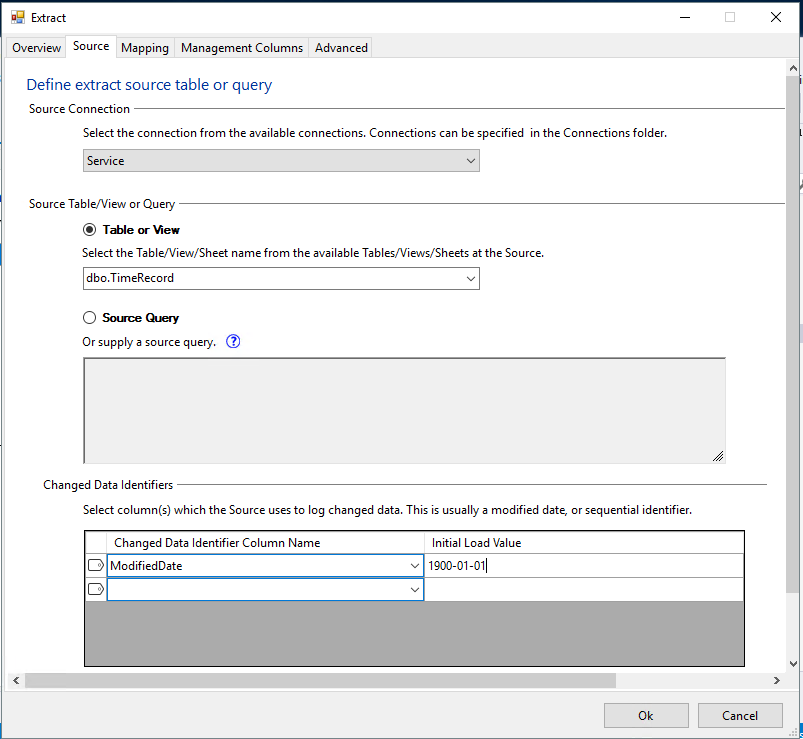
Source Tab
The Source tab defines the source table or query of the Extract.
- Connection. Select the “Service” connection in the Connection dropdown.
- Source Table View. Select the “dbo.TimeRecord” in the ‘Table or View‘ dropdown. You can also start typing dbo.Tim… and the matching values will display for selection.
- Change Data Identifier table. Select the “ModifiedDate” in the ‘Change Data Identifier Column Name‘ field. Set the ‘Initial Load Value‘ to “1900-01-01“. The ‘Change Data Identifier Column Name‘ field is the source column that the source system uses to track changes to the source table/view. The ‘Initial Load Value’ is used in the Extract the first time it runs. The idea is to set this to a very low value so that the initial run of Extract does the equivalent of a ‘Full Extract’, extracting all rows in the source. You can tailor this to your needs. For example, you may only want rows for the past 3 years.
Your result should look like this:
Further Information
- Source Query. Alternatively, you can select the Source Query option if the source of the Extract is a query rather than a single table. Enter your query in the source query text box. This query should be written as if it was executed against the Source database. Don’t specify a database server or database name in the Query. The connection manager handles this, and it may change depending on the configuration you generate with. A Query can’t contain an ORDER BY, DECLARE, as the query is wrapped as a subquery when generated. If the query is invalid, and you click the mapping tab, an error message is displayed.
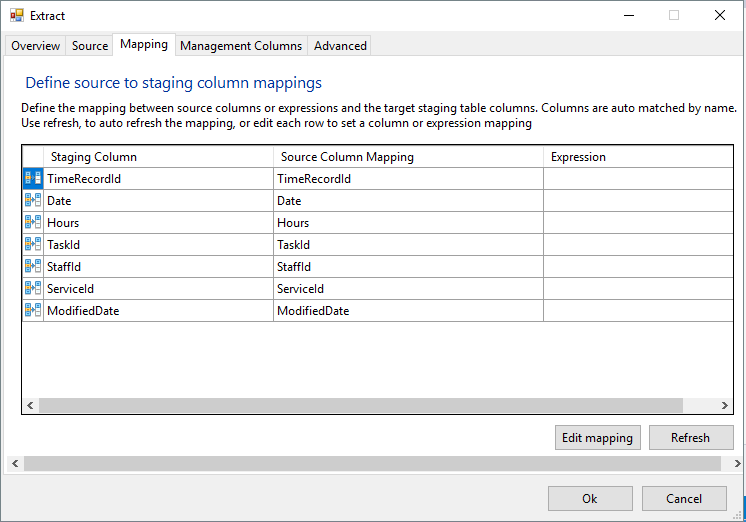
Mapping Tab
The Mapping tab defines the column mappings between the source columns and the staging table columns. The mappings may also be expressions. The mapping happens automatically based on a name match between the source and staging table columns.
- The mapping table should be pre-populated with column mapping between the source table/query and staging table columns. There is nothing to do.
Your result should look like this:
- Click the Ok button at the bottom of the dialog to save the Extract.
- Click the Save (disk icon) on the Visual Studio toolbar to save the Staging table.
Further Information
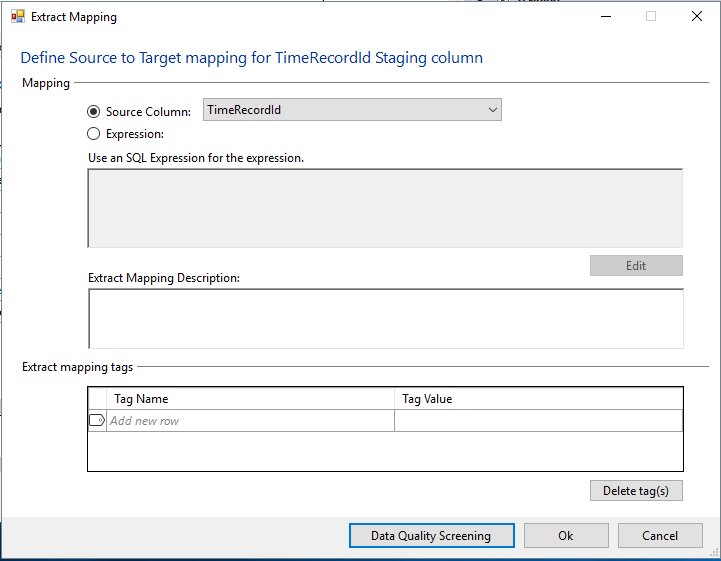
- Staging Column. The Staging Column is the name of a Staging table column. The Staging Column is populated from the list of columns defined for the Staging table.
- Source Column Mapping. The Source Column Mapping is the name of the Source column that maps to the Staging table column. This field is auto-matched based on the name after a source is selected in the Source tab.
- Double click the column or select and click Edit mapping and the Extract Mapping dialog appears. In the dialog you can change the setting for the column, define an expression mapping, and add a description to the mapping for documentation purposes.
-
- Source Column Mapping. Select a different Source Column mapping for the Staging column from the drop-down.
- Write an Expression for the mapping. Note the Expression can only reference source columns (not staging columns). The Expression is T-SQL and must be a valid SQL expression when executed against the Source database. It should be written as if the expression will be part of a Select clause. E.g. SELECT expression FROM Source Table.
- Extract Mapping Description. A description of the mapping for documentation purposes. Non Mandatory.
- Extract Mapping Tags. Define custom metaData for the mapping particular to the chosen Extract pattern.
- Data Quality Screening. Future functionality.
Advanced Tab
On the advanced tab, you will find additional properties for the Extract. The properties are different depending on the target technology of the Staging data store defined in the configuration. In this case, the target technology is Azure Data Warehouse and Azure Data Lake.
The properties include:
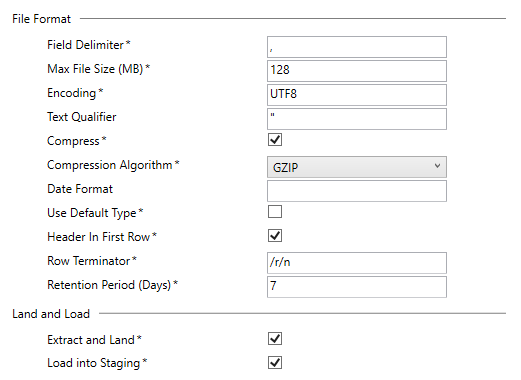
File Format
These properties describe the format of the files that are loaded into the Azure Data lake. The defaults are based on best practice, but you can change these per entity. The only format supported at the time of writing is CSV files. Other formats may be supported in the future. These setting are also used when defining the External Data Source in Azure Data Warehouse for Polybase extracts.
- Field Delimiter. The field delimiter in the CSV file. THe delimiter between field values. e.g. a comma.
- Max File Size (MB). The max size of the file that will be loaded into the Data Lake. For example, if the max size was 10MB, and 100MBs was extracted, then 10 files would be created, zipped and uploaded.
- Encoding. The encoding of the file. Valid values are UTF8 and UTF16. UTF8 is approx half the size of UTF16 in many languages.
- Text Qualifier. The character that qualifies text in text fields in the CSV files. e.g. a double quote.
- Compress. Choose to compress the file before being uploaded to the Data Lake.
- Compression Algorithm. The algorithm used to compress the file, only GZIP is supported.
- Date Format. A custom date format that Polybase uses to load data. Only leaving this blank is supported by the default generation templates. The current Dimodelo Data Warehouse Studio pattern treats dates as text until it reaches the Azure Data Warehouse where it is converted into the correct date type.
- Use Default Type. Use the polybase default date types. Leave as unticked.
- Header In First Row. Add column headers as the first row of the file.
- Row Terminator. The value to use as the row terminator of the file.
- Retention Period. The number of days to keep the extracted data in the Data Lake. 0 = keep forever. E.g. 7 = keep 7 days of Extracts.
Land and Load
You can choose to just ‘Extract and Load’ the data to the Data Lake, just ‘Load into Staging’ (i.e. Load the data into Azure Data Warehouse Staging from the Data Lake from a pre-loaded Azure Data Lake file), or both.
- Extract and Load. Tick to ‘Extract and Load’ the data to the Data Lake.
- Load into Staging. Tick to load the data into Azure Data Warehouse Staging from the Data Lake from a pre-loaded Azure Data Lake file.
More Details
If you have more complex Extract requirements, it may be necessary to write a query. In this case, it is still possible to do an incremental Extract. See below.

In the query, you must refer to your ‘Change Data Identifier’ columns as @ChangeDataIdentifierColumnName where @ChangeDataIdentifierColumnName is any name you choose. The query should be something like:
SELECT …
FROM …
WHERE ChangeDataIdentifierColumnName > @ChangeDataIdentifierColumnName
However, you can write much more sophisticated queries if necessary. Then in ‘Change Data Identifier’ table, select the column(s) that are defined as @ChangeDataIdentifierColumnName in the query and supply an ‘Initial Load Value’ value. The ‘Initial Load Value’ is used in the Extract the first time it runs.
How the generated code works
As stated previously, each time the Extract is executed Dimodelo saves in the control Parameters table the maximum value that was extracted for each of the ‘Change Data Identifier’ column(s). When you define your source as a table/view, Dimodelo generates a query with the appropriate @ChangeDataIdentifierColumnName placeholders for each ‘Change Data Identifier’. The query would be something like
SELECT *
FROM Table
WHERE ChangeDataIdenitifierColumnName > @ChangeDataIdentifierColumnName
This query is used as the query for the source component of the Dimodelo Shift extract. When you define your source as a query, Dimodelo Data Warehouse Studio sets the query in the source component of the Dimodelo Shift data flow to the provided query. Before the Dimodelo Shift data flow is executed, the maximum value of each ‘Change Data Identifier’ column(s) that was stored in the Control Parameters table by the previous invocation of the Extract is retrieved. The maximum value is substituted for the @ChangeDataIdentifierColumnName in the source query prior to the data flow being executed. It is also possible to include Dimodelo Data Warehouse Studio’s standard batch control properties (like batch_effective_date, batch_execution_id) as parameters in the query. Just include them as @controlpropertyname. Read the Managing and Monitoring ETL batches Guide for more information about batch control properties.
The incremental extract pattern works for .Net Data Provider, ODBC (which can take a query) and OLE DB sources. It doesn’t work for excel and file sources. Excel and file sources, by their very nature usually represent a batch of records, or are small in size. If you need to do this with a file source, then connect to it as an ODBC source.
Reloading all records
With the incremental pattern, it is possible to reload all records from the source (or a subset of all records) by changing the values stored in the Control Parameters table.
The image below shows the content of the ControlParameters table in the Staging database. You can edit the value for your initial value parameter. The next time DA executes the Extract, it will use the updated value from the ControlParameters table.
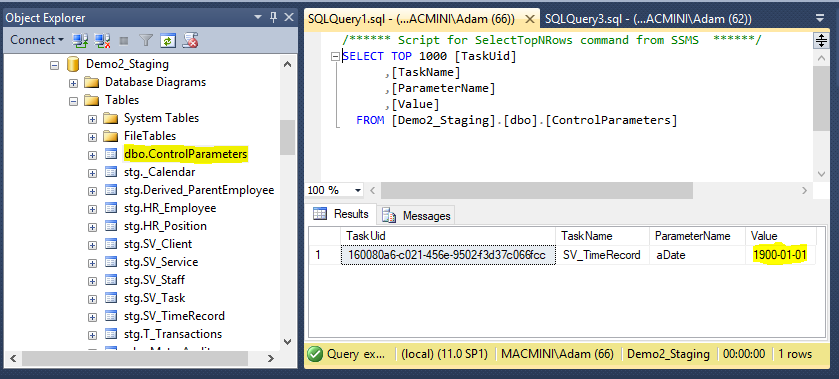
Note: Dimodelo puts an ‘a’ in front of the parameter name to eliminate clashes with reserved words when generating SQL statements.
Using the Incremental Pattern with RowVersion/Timestamp
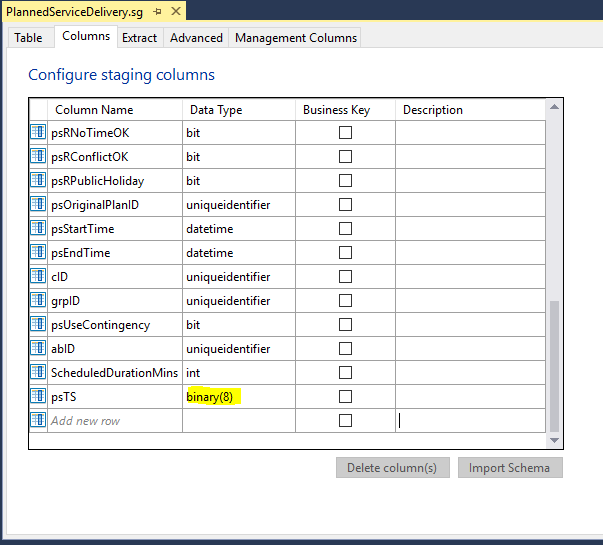
- First, the Rowversion column in the Dimodelo staging table should be defined with a Binary(8) data type, or a varbinary(8) if the source column is null.
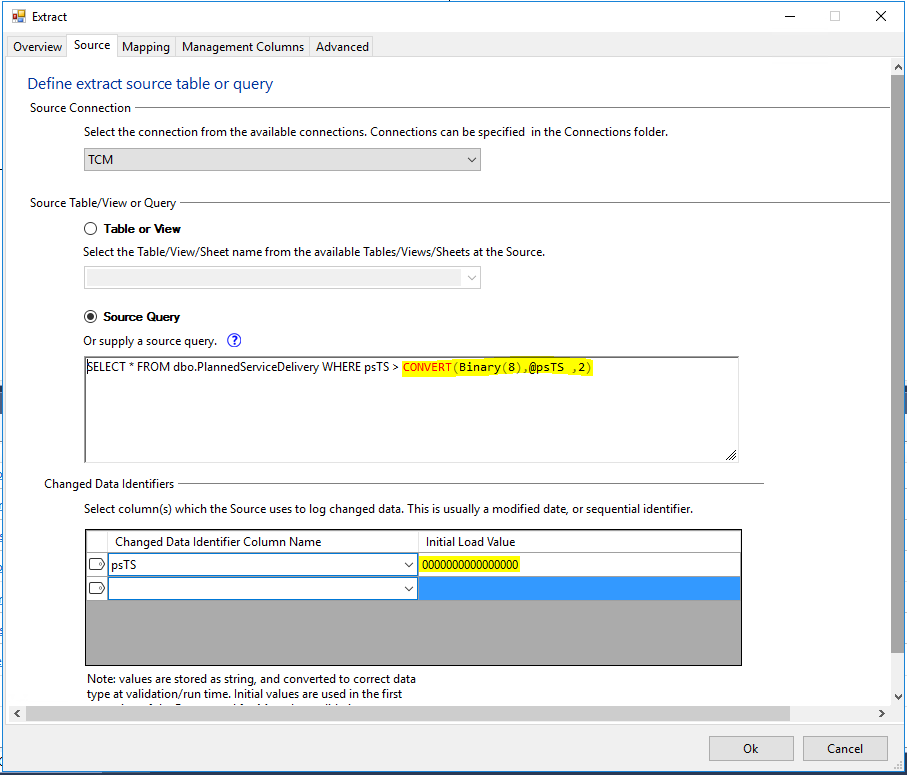
2. Define the Extract as an Incremental extract based on a query. The default code generated when you use a table as the source doesn’t work in this case. Use Convert with style 2 to convert the change identifier to a binary(8) value. Set the initial value for the change identifier to a 16 digit hexadecimal value without the leading 0x.
See below:
More about binary style conversions can be found here – https://docs.microsoft.com/en-us/sql/t-sql/functions/cast-and-convert-transact-sql?view=sql-server-2017