
Connecting to Source Systems
The first things you need to do is to add a connection to one or more source databases etc. A Connection defines the connection string and other properties to a Source database, file, SaaS provider etc.. Dimodelo Data Warehouse Studio supports many different types of Sources Systems including databases (Any database type that has an .NET Data Provider or or OLEDB driver e.g. DB2, Oracle, SQL Server etc), Excel Files, Flat Files, and ODBC sources including those that connect to SaaS providers like Dynamics 365 and Salesforce etc.
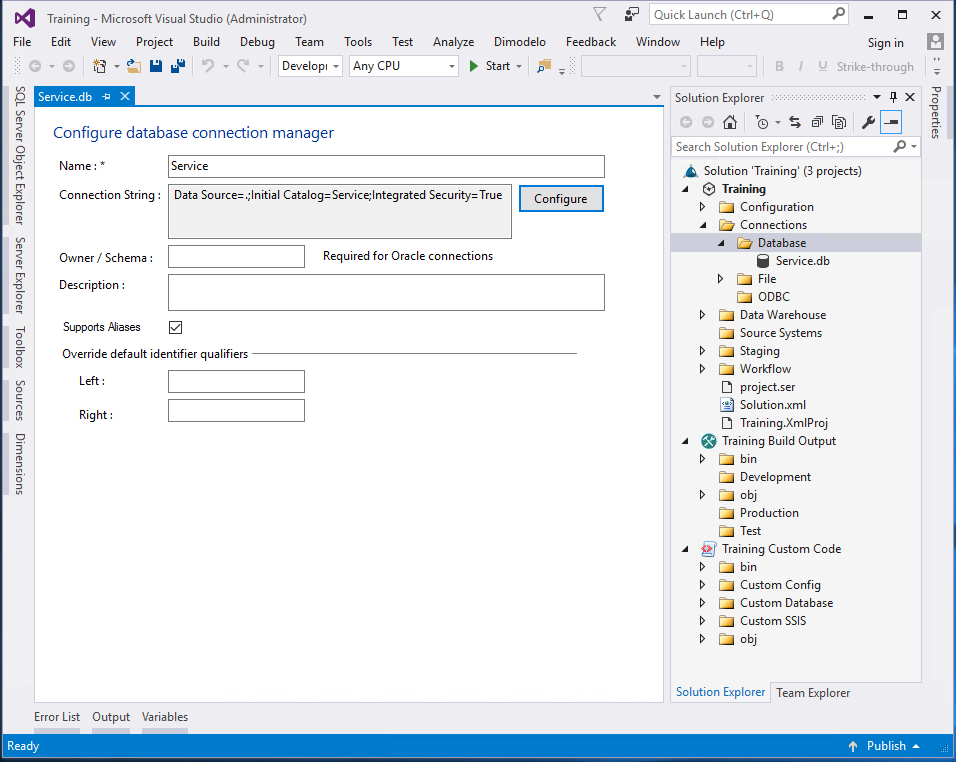
Define a new Database Connection for the “Service” SQL Server database
- Expand the ‘Connections’ Node in the Solution Explorer tool window.
- Right-click the Database folder and click ‘Create New’.
- Enter the name “Service” into the Connection Name field. The Connection names ‘Staging’ and ‘Warehouse’ are reserved and can’t be used.
- Click the Configure button.
- Select the Microsoft SQL Server data source (e.g. Microsoft SQL Server) in the Data Source list, and then the “.NET Framework Data Provider for SQL Server” Data Provider in the Data Provider drop-down. The dimodelo.desk.com site contains information about selecting the correct parameters for different types of Databases including Oracle.
- Click OK.
- The connection properties dialog appears. Fill in the details for your connection. Type the name of your SQL Server instance in the Server Name field. Choose “Use Windows Authentication” or “Use SQL Server Authentication” as required. Type the database name “Service” in the “Select or enter database name“.
- Click Ok.
- For some providers (like Oracle and DB2) it is necessary to supply the Owner/Schema details. The Owner Schema will filter the list of tables presented for the source in Dimodelo Data Warehouse Studio and can improve the performance of the MetaData import function of Dimodelo Data Warehouse Studio.
- Click the Save icon (disk icon) in the Visual Studio Tool Bar.
- There should now be a Service.db node under Connections>Database in the solution.
Your result should look something like this:
After you create a connection, you must also create a new Source System. The Source System contains a little more meta-data information about the Source System.
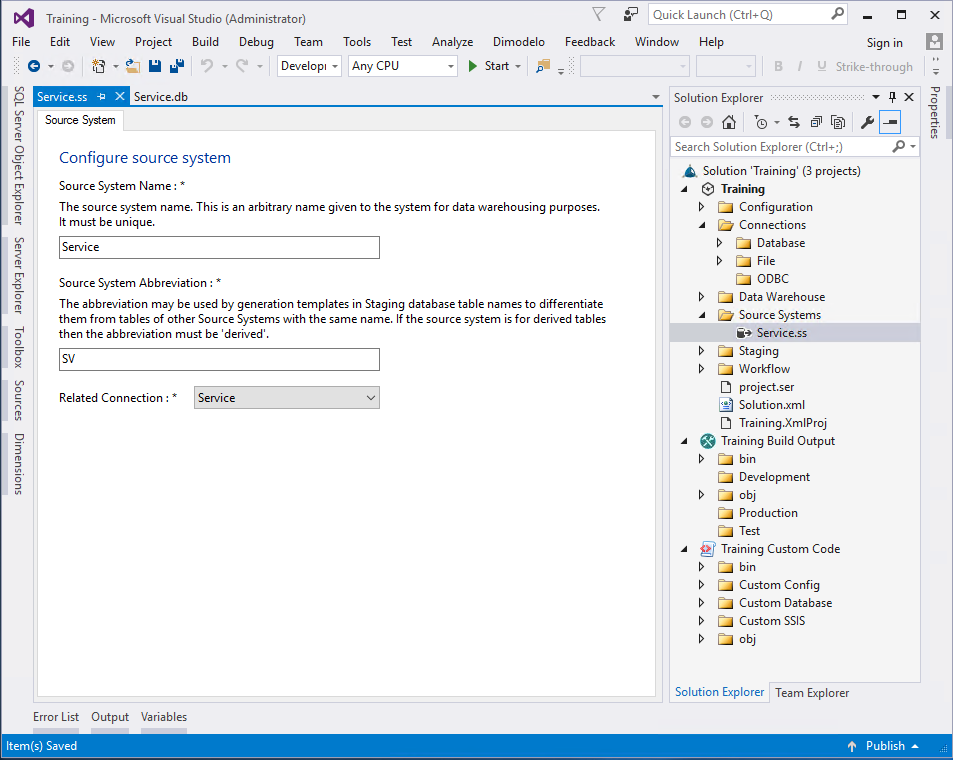
Create a Source System record for the “Service” Connection
In addition to a Connection Manager, a Source System record needs to be created. The Source System record contains additional information about the nature of the Source system.
The most important aspect of creating a Source System record is to define a ‘Source System Abbreviation’. The ‘Source System Abbreviation’ is used to prefix table names in the Staging database. This ensures there is no naming conflicts in the Staging database between tables with the same name from different Source Systems.
Without a Source System, a Staging table can’t be defined, and the Source System won’t appear in the Sources tool window.
To Create a Source System:
- Right-click the Source Systems folder in the Solution Explorer and click Create New. The following dialog appears.
- Source System Name. Give the source system the unique name “Service“. This is the name that appears in the Solution Explorer.
- Source System Abbreviation. In this case, use the source system abbreviation “SV“. The ‘Source System Abbreviation’ should be a two or three letter abbreviation that is unique within the project. The ‘Source System Abbreviation’ is used to prefix table names in the Staging database. This ensures there is no naming conflict when staging tables with the same name from more than one Source System.
- Connection. Associate the Source System with the “Service” connection you just created. Select the “Service” Connection Manager in the dropdown. This is mandatory.
- Click the Save icon (disk icon) in the Visual Studio Tool Bar.
Your result should look something like this:
In the future Source System records will be removed, and the information combined into the Connection information.
More Information
- Supports Aliases. For some sources, it is necessary to untick “Supports Aliases”. When Dimodelo Data Warehouse Studio is trying to determine column precedence information for an entity, and the source of the entity is a query, Dimodelo Data Warehouse Studio will modify the query to add table and column name aliases e.g Select * FROM tableName TN <- Dimodelo adds TN to the query) to assist in the column precedence derivation. However, some sources (e.g. some SaaS ODBC sources) don’t support aliases. In that case, it is necessary to untick this value.
- Left and Right qualifier identifiers. When generating queries against the source system, Dimodelo uses identifier qualifiers. For example, the identifier qualifiers in SQL Server are [ and ]. The ANSI standard is ” and “. However, some data providers don’t return the default identifier qualifiers to Dimodelo. In this case, it is necessary to add the values in this dialog.
In the below video you will see a demonstration of adding a database and ODBC connection to a Dimodelo Data Warehouse Studio project.
Video – Defining a database and ODBC connection
Video – Defining a file connection
There is more specific information about Connections tips and tricks at our support site dimodelo.desk.com.
To connect to Big Data and SaaS sources we suggest you use the following ODBC driver providers: