Generating and Deploying Code
[/et_pb_text][et_pb_text admin_label=”Text” background_layout=”light” text_orientation=”left”]Overview
When you choose to Generate, the source code to create/maintain Data Warehouse and Staging database tables and the Extract Transform and Load (ETL) SSIS packages are generated from the design captured in DA. When you choose to Deploy, the source code to create/maintain the Data Warehouse and Staging database tables is executed against the target database server, and the SSIS packages are moved to the Deployment folder path on a local or remote server. When generating ETL code Dimodelo Data Warehouse Studio first generates and deploys (and later deletes) a temporary Build version of the Staging and Data Warehouse databases to your build server (which can be your local PC). The Build server and database is configured in the Dimodelo> SQL Server for ETL Build menu option. ![]() Code can be generated from within Dimodelo Data Warehouse Studio through the Dimodelo menu. Dimodelo Data Warehouse Studio has 9 Generate and Deploy options.
Code can be generated from within Dimodelo Data Warehouse Studio through the Dimodelo menu. Dimodelo Data Warehouse Studio has 9 Generate and Deploy options.
- Generate> Generate Data Warehouse. Generates the DDL for the Staging and Data Warehouse databases.
- Generate > Generate ETL. Generates the SSIS packages to implement the ETL.
- Generate > Generate All. Generates both the Data Warehouse and SSIS ETL.
- Generate and Deploy > Generate and Deploy Data Warehouse. Generates the DDL for the Staging and Data Warehouse databases and executes it against the target server.
- Generate and Deploy > Generate and Deploy ETL. Generates the ETL and deploys it to the Deployment path defined in the Configuration file.
- Generate and Deploy > Generate and Deploy All. Generates and deploys both the Data Warehouse and SSIS ETL.
- Deploy > Deploy Data Warehouse. Executes the previously generated DDL against the target Staging and Data Warehouse databases. The primary purpose being to update the Staging and Data Warehouse databases to match the latest version of the design.
- Deploy > Deploy ETL. Copies the previously generated SSIS Packages to the Deployment path defined in the Configuration file.
- Deploy > Deploy All. Does both deploy Data Warehouse and Deploy ETL.
When in Development we recommend that you use the Generate and Deploy ETL option. This option refreshes everything, so no change is missed. As you become more familiar with the process, you may want to just Generate and Deploy the ETL, if your changes have only affected the ETL and not the structure of any tables. When generating and deploying to either a Test or Production environment, we recommend Caution, and following the recommendations in the Deploying Code Section. Dimodelo Data Warehouse Studio supports generating code for multiple environments. Code must be generated for each environment, as each environment will have different source connections and different target Staging and Data Warehouse Servers. More information about configuring DA to support multiple environments can be found in the Project Configuration section.
Generation and Deployment Pre-Requisites
It is important that configuration is set up correctly before generating the code. This includes
- Setting up connections strings for the Staging, Data Warehouse and Source databases for the target environment.
- Setting the Default Generation Output Path in the Dimodelo Data Warehouse Studio Configuration file.
- Setting the ETL Code Deployment Path.
The configuration for Dimodelo Data Warehouse Studio projects, supporting multiple Environments is discussed in detail in the Project Configuration section. It is important
How to Generate Code
- Before Generating ensure you have applied the Generation and Deployment Pre Requisites and Project Configuration.
 Make sure that the correct Project Configuration is selected for the environment you want to generate for. The Project Configuration is associated with a DA Config file and this determines connection strings etc are used in the generated SSIS packages.
- If you have added a new source system, check that the connection string in the associated DA Config file is correct. You may need to change the connection string for different environments in different DA Config files.
- Click the desired menu option. E.g. Dimodelo>Generate and Deploy> Generate and Deploy All. This option generates and deploys all the code to create/modify your Data Warehouse and Staging databases and SSIS ETL.
- During code Generation the Generation Results Window will show a list of the files that have been generated. If the Generation Results Window is not visible, click the Generation Results tab at the bottom of the Dimodelo application. If there are errors, both the Generation Results Window and the Error List Tool window will display the errors.

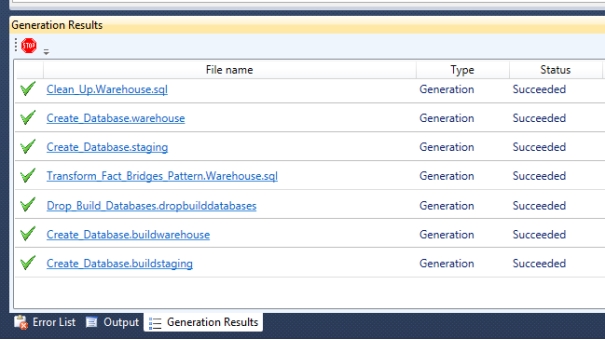
- View the generated code. You can click on any file link in the Generation Results Window to open the windows default application for that file type. Otherwise you can navigate to the output folder to view the output files.
Trouble shooting
Sometime code generation will fail. This is usually due to an issue with the design or configuration Meta data. Do the following to try to fix the issue:
- Check the design meta data thoroughly for inconsistencies or omissions. This will usually be the cause of an issue.
- The SSIS exception messages can be cryptic Usually googling on the exception code can give you clues on the issue.
- Refer to the Trouble Shooting guide on the Dimodelo Data Warehouse Studio website or
- Visit dimodelo.desk.com for more information on specific issues.
- Raise a ticket with our support.
Understanding the Generation Process
Dimodelo Data Warehouse Studio supports an open API for developers to create custom Generation Engines and Generation Templates. More information can be found in the API guide. An explanation of the generation process can be found in the Dimodelo Data Warehouse Studio Code Generation Process blog posts:
Custom Generation Templates
Dimodelo Data Warehouse Studio ships with an EzAPI and XSLT Generation Engine. The XSLT engine takes XSLT generation templates as input. There are several EzAPI templates that are used to generate SSIS Packages for ETL. More information about EzAPI can be found on the Dimodelo blog. Developers can develop their own XSLT or EzAPI templates to generate custom code that better suits their target environment. They can choose to use the standard templates, a combination of standard and custom templates or only custom templates. More information about creating your own SSIS generation templates can be found at:
- https://www.dimodelo.com/blog/2013/getting-started-with-ezapi/
- https://www.dimodelo.com/blog/2013/generating-ssis-packages-using-ezapi-hello-world/
Custom Generation Engines
A custom generation engine can be created, if XSLT or EzAPI is not an appropriate way of generating code for a target platform.
Custom Deployment Engines
Dimodelo Data Warehouse Studio supports an open API for developers to create custom Deployment Engines. More information can be found in the API guide. A custom deployment engine can be created, if a deployment engine doesn’t exist for your target environment. The standard deployment engine will deploy SQL and DDL to a Relational DBMS. If you have custom code for another platform, you can create a Deployment Provider to deploy that code to that platform.
Generated Documentation
DA generates a data dictionary in two html files:
- Dim_Data_Dictionary.html which contains the Dimension documentation.
- Fact_Data_Dictionary.html which contains the Fact documentation. Fact_Data_Dictionary.html references Dim_Data_Dictionary.html but it must be in the same folder.
The style of the output can be modified by editing the Dimodelo.css file. Example Documentation: 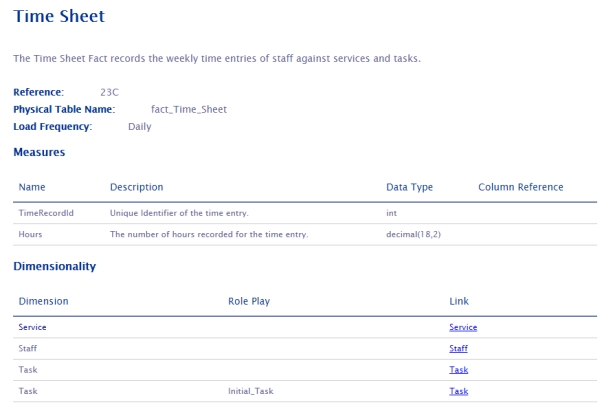
Source Control
Dimodelo Data Warehouse Studio eases the issues commonly experienced by Data Warehouse projects when attempting to migrate Data Warehouse projects up through development environments. Because Dimodelo Data Warehouse Studio projects can be placed under source control just like any other Visual Studio project it is possible manage a Dimodelo Data Warehouse Studio project just like any other project. Various trunk and branches can be created with different versions of the project, as required for major or minor releases, patches etc.
Production Deployment
Prerequisites
- Install and Register Dimodelo Management Console on the Data Warehouse Server. We recommend using the 64 bit version for 64 bit operating systems. See the Installation Guide on the Dimodelo Solutions web site www.dimodelo.com for instructions.
- Create a folder on the server where SSIS packages can be deployed too.
- Create a folder called Batch on your target server in a sensible place, perhaps where SSIS packages are deployed to.
- Create and modify the DA Config file and DA Visual Studio Project configurations for the target environment. For more information see the Generation and Deployment Pre Requisites and Project Configuration sections.
Deployment Process
This deployment process assumes that the DA project exists in the recommended in the Step 1 – Set up the Solution Folder Structure section.
- Check in the DA project to Source Control. There may be other steps you need to do to tag/branch/merge the repository at this stage, but that’s just standard source control.
- Backup the Data Warehouse database (If it isn’t done automatically) in the target environment!!!!!
- In Dimodelo Data Warehouse Studio
- Select the project configuration for the environment you want to deploy to (i.e. TEST, PROD)
- First generate the Data Warehouse code only through the Generate > Generate Data Warehouse option.
- If you have made any changes to custom scripts or SSIS projects/packages in your Custom folder then manually copy from Custom/../DEV/ to Custom/…/Env/ where Env is the target deployment environment, and make any changes for the new environment as required.
- Deploy the changes to the Data Warehouse and Staging Databases to your target environment servers using the Deploy > Deploy Data Warehouse option. Note – This will update the databases in your target environment, so be sure you have a backup!
- Review all facts and dimensions for soft deleted columns (Z_DIL_Dropped) in the target Data Warehouse database– and remove these columns once satisfied.
- Generate the ETL for the target environment. Use the Generate > Generate ETL option. Note A warning dialog should appear.
- Deploy the ETL to the target environment. . Use the Deploy > Deploy ETL option.
- Copy the workflow file (Data Warehouse/Workflow) to the Batch folder on the target Server.
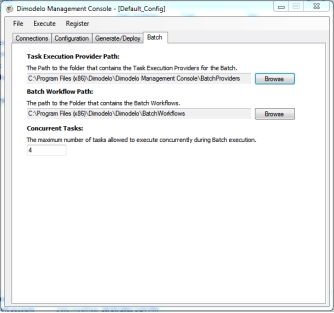
- Copy the Dimodelo/Config/Env.cuf file to the Batch folder on the target Server, where Env.cuf is the DA Config for file for target environment. Edit the Env.cuf on the server using Dimodelo Management Console. Change Task Execution Provider Path directory from “Dimodelo\Dimodelo” to “Dimodelo\Dimodelo Management Console” as shown below. When only Dimodelo Management Console is installed, the BatchProviders path used by Dimodelo Data Warehouse Studio is invalid.


- Deploy the Cube/Tabular model using your preferred method.
Schedule the ETL Batch Job
Read the scheduling the Batch section of the Batch Management Facility document for more information on scheduling the ETL Batch job.
[/et_pb_text][/et_pb_column][/et_pb_row][/et_pb_section]